Link in Bio for Event Organizers: Tickets, Details, and Updates
An event organizer's link in bio should send each visitor to the current event and the next decision they need to make . While tickets are available, lead with the correct ticket or registration page. Keep the date, city, format, venue information, accessibility details, schedule, and organizer contact close enough to prevent uncertainty. When sales close, the event changes, or the doors open, update the first action rather than leaving an expired ticket link at the top.
A useful default order is:
- organizer or event-series identity;
- the featured event's name, date, city, and format;
- one primary ticket, registration, or RSVP action;
- practical details such as schedule, venue, transport, and accessibility;
- a clear attendee-help route;
- other confirmed events or a waitlist; and
- organizer updates and social profiles.
That order is a starting point, not a permanent template. A conference opening early-bird registration needs a different first screen from a free community workshop happening this afternoon. The page should change with the event state while its URL and organizer identity remain stable.
What is an event organizer link in bio page?
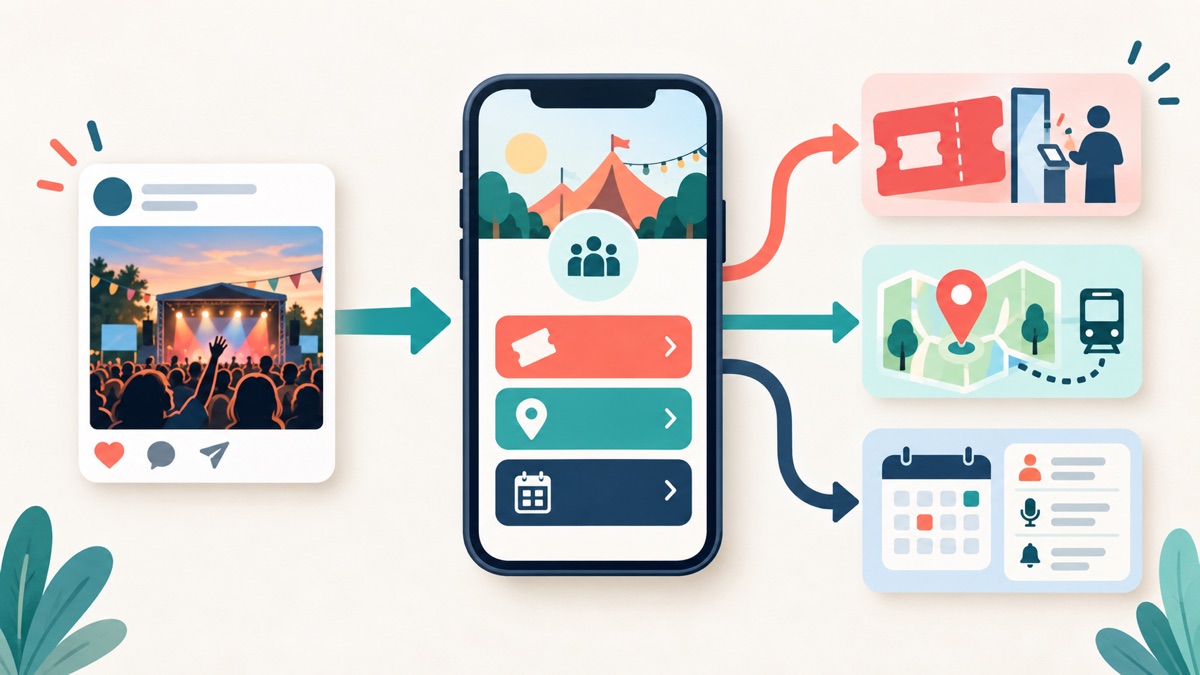
An event organizer link in bio page is a compact mobile routing page between social promotion and the systems that actually run an event. It can direct a visitor to a ticket listing, registration form, venue map, schedule, accessibility information, livestream entry, attendee update, sponsor page, or organizer contact without making all of those destinations compete equally.
It is not the ticketing system. Belink can organize and label the routes, but the ticket provider should handle inventory, attendee data, payment, confirmation, and ticket access. It is not the event's complete website either. A multi-day conference may still need a searchable agenda, speaker pages, travel guidance, policies, and sponsor information on a larger site. The bio page gives a social visitor the shortest credible path into that information.
That distinction also separates this guide from a page for an event planner selling services. A planner seeking new clients might lead with a portfolio and enquiry form. An organizer promoting an actual festival, workshop, meetup, conference, exhibition, or pop-up must first help a prospective attendee choose the right event, ticket, location, or participation mode.
If your destinations already exist but the order feels arbitrary, use the seven-step link-ordering system before redesigning the page. The hard part is deciding what deserves attention now, not finding another place to store links.
Choose the event state before choosing the first button
An event page becomes misleading when the promotion changes but the bio link does not. Name the current state before you edit anything:
- Announced, not yet open: explain what the event is and lead to a legitimate notification or waitlist route if one exists.
- Registration open: lead to the exact event listing or registration form.
- Nearly full: keep the ticket destination authoritative; do not invent urgency or copy a remaining quantity you cannot keep synchronized.
- Sold out: replace “Get tickets” with a real waitlist, verified resale information, or a clear sold-out notice.
- Postponed or rescheduled: lead with the update and the authoritative ticket-provider instructions.
- Happening today: move practical arrival, schedule, entry, and support information higher.
- Finished: remove the registration action and offer a recap, recording, next confirmed date, or organizer updates.
This state should govern the whole first screen. Changing only the button while leaving “Tickets available now” in the description is not a real update. Neither is leaving an old poster visible after the date has passed.
Assign one person to own the transition. Record the featured event, primary destination, start and end time, ticket status, next review time, and replacement action. That small operating note prevents a social manager, ticketing lead, and venue contact from assuming someone else will close the loop.
Build the page around one attendee decision
The visitor did not tap because they wanted to study the organizer's entire archive. They usually want an answer to one of four questions:
- Is this event for me?
- Can I attend, and which ticket or registration option is right?
- Where and when is it, and what do I need to know before arriving?
- I already registered; where is the current attendee information?
Your page can support all four, but one should lead. Finish this sentence before ordering the links:
A person arriving from our current posts should first __ .
“Register for the Saturday workshop,” “choose in-person or virtual attendance,” and “read today's arrival update” are usable answers. “Engage with our event” is not. The clearer sentence usually produces the clearer first button.
For a single focused campaign, the one-goal or launch layout often works. For an organizer with several active dates, use a hub with one featured event and a short, clearly grouped list of other confirmed events. Do not give an old monthly meetup and a major ticket launch identical visual weight simply because both exist.
The best link in bio order for event organizers
The sequence below works for conferences, festivals, workshops, public talks, exhibitions, community gatherings, pop-ups, and recurring event series. Remove anything the attendee does not need, and do not publish placeholder links for details that are not confirmed.
1. Confirm the organizer and featured event
The top of the page should answer “Am I in the right place?” Use the organizer's real name, a recognizable image, and one short description of the events it runs. Then identify the featured event with the same spelling used on the ticket page.
Include the date, city, and format when they distinguish the choice. “Night Market — September 27, Hangzhou” is more useful than “Our next event.” For a virtual event, say virtual. For a hybrid event, make the available modes explicit. Do not label an event “global” merely because the livestream can technically load in several countries; time zones, language, access, and ticket terms still matter.
Keep the identity and event naming consistent after the tap. A visitor who sees one festival name on Instagram, another abbreviation on the bio page, and a parent-company name at checkout may reasonably wonder whether the ticket page is legitimate.
2. Send the primary action to the exact ticket or registration page
“Get tickets — Sept 27” should open that event, not a generic organizer profile or venue homepage. “Reserve a free workshop place” should open the relevant registration flow. If several ticket types exist, let the ticketing destination explain inventory, eligibility, fees, and checkout rather than recreating a brittle summary in the bio button.
Eventbrite's current help documentation confirms that organizers can create a custom event link and use it when sharing an event through social channels. It also notes that the original event link continues to work after customization. The useful lesson is broader than one platform: share a stable, verified destination, and test it from the public side before publishing it in every profile. See Eventbrite's custom event-link instructions for the platform-specific behavior.
Open the destination in a private or signed-out session. A team member's logged-in dashboard can hide a broken public route, an unpublished listing, a region restriction, or an accidental organizer-only link.
3. Keep decision details on the authoritative event page
The ticket or event page should contain the information a person needs before committing: what the event is, date and time, location or access mode, ticket types, price and fees where applicable, eligibility or age restrictions, refund terms, and organizer contact. The bio page should summarize only enough to set the right expectation.
Do not copy changing policy text into several buttons and captions. Eventbrite's current organizer guidance, for example, requires organizers using its platform to set a refund policy and explains how ticket buyers request refunds. Those are provider-specific rules, and organizers must also follow the requirements that apply in their own market. Link to the authoritative policy or event listing instead of paraphrasing legal or commercial terms you may not keep current. The platform's refund-policy guidance is a useful example of why the transaction destination—not the bio page—should own those details.
If the social post highlights one speaker, workshop, or performance inside a larger event, the first destination can still be the main event listing when that is where registration happens. Use the button and short description to preserve context: “Register for the conference — includes the design workshop” is clearer than pretending the workshop has a separate ticket.
4. Give attendees a practical details route
Prospective attendees and registered attendees often need different things. After the primary registration action, add one practical route that answers the questions most likely to block attendance:
- schedule or running order;
- venue address and entrance;
- public transport, parking, or shuttle information;
- accessibility information and accommodation contact;
- what to bring and prohibited items;
- check-in requirements; and
- current weather or outdoor-event instructions when the organizer can maintain them.
Name the destination precisely. “Venue, transit, and accessibility” is more predictable than “Plan your visit.” If the link opens a long event page, use an anchored section only when that anchor is stable and works on mobile.
Avoid using a map link as the only venue information. A map pin does not explain which entrance is open, whether step-free access uses another door, when a building opens, or how to request an accommodation. Put those details on the event page and use the map as a supporting route.
5. Separate in-person and virtual attendance
A hybrid event is not one vague “Join” button. An in-person attendee needs a physical venue and entry process. A virtual attendee needs the correct online access information, timing, and support. Before registration, label the options clearly enough that a buyer does not select the wrong mode.
Eventbrite's current hybrid-event setup guidance recommends separate in-person and online listings on its platform, clear titles, and links between those listings. Your tools may differ, but the principle is sound: distinguish the modes wherever a visitor chooses, and make it easy to move to the other legitimate option.
Do not publish a private meeting or stream URL on a public bio page unless the event is intentionally open and the access model supports that exposure. For registered attendees, use the secure delivery method provided by the event or streaming system. A public bio link can point to “Virtual attendee access help” without exposing the actual session.
Large conferences and venues may also need a separate production workstream for audio, presentation systems, video conferencing, broadcast, or signage. Belink's sister business Sinoway provides audiovisual integration across Asia for that kind of venue-side requirement. That work supports the event itself; it does not replace a clear attendee route, ticket page, or access instructions.
6. Make support specific to the event
“Contact us” is often too vague during a live campaign. Tell people what the route is for: “Ask about tickets,” “Request an accessibility accommodation,” “Sponsor enquiries,” or “Registered-attendee help.” Keep press, vendor, speaker, and attendee enquiries separate when different team members own them.
Do not invite sensitive personal, payment, or health information through a public social message. Direct the visitor to the official support channel and state what basic information helps locate the booking. The ticket provider may already offer an authenticated contact path attached to the order.
If the event is cancelled, postponed, or materially changed, make the update the primary route. Eventbrite's cancelled-event guidance requires organizers on its platform to communicate with attendees and process refunds under its rules. Even when you use another system, a celebratory promo page should not remain above a critical attendee update. The bio page can surface the notice, but the authoritative provider or organizer page must explain the actual process.
7. Give the page a useful state after the event
An event URL does not need to become a graveyard of expired ticket buttons. After the final session, choose the next honest state:
- view the recap or approved recording;
- see event photos;
- join the next-date waitlist;
- browse confirmed upcoming events;
- subscribe to organizer updates; or
- read the final attendee notice.
Do not imply that another date exists before it is confirmed. “Hear about the next workshop” is honest when there is a real signup process; “Book the next workshop” is not if no workshop is scheduled.
For a recurring series, keep the main bio URL stable and swap the featured event. Archive pages, speaker histories, sponsor reports, or substantial resource libraries belong on a website. The guide to using a bio page and a website together shows where the compact route should hand off to deeper information.
Better button copy for event pages
An attendee should be able to scan the labels without reading the surrounding paragraph and still predict what opens.
| Vague label | More useful label |
|---|---|
| Tickets | Get tickets — Sept 27 |
| Register | Reserve a free workshop place |
| Events | See all confirmed events |
| Info | Schedule, venue, and accessibility |
| Map | Get directions to the east entrance |
| Join online | Choose virtual attendance |
| Updates | Read today's attendee update |
| Contact | Ask about an existing ticket |
| More | Join the next-event waitlist |
The W3C's guidance on link purpose in context says people should be able to determine a link's purpose from its text or programmatically related context. Descriptive labels help everyone, including people who navigate through a list of links with assistive technology.
Buttons also need enough size and spacing for touch use. The W3C's enhanced target-size guidance recommends at least 44 by 44 CSS pixels for custom controls, with defined exceptions. You do not need to turn the bio page into a wall of giant buttons, but tiny icon-only controls are a poor place for critical ticket, map, or help actions.
Four event link in bio examples
These are information architectures, not claims about ticket sales or attendance. Adapt the order to the real event and remove any route you cannot maintain.
Paid local workshop
Primary job: move an interested visitor from a demonstration clip to the correct workshop registration.
- Reserve a ceramics workshop place — Oct 10
- What the session covers
- Studio address and arrival instructions
- Accessibility and accommodation contact
- Cancellation and refund policy
- See future workshops
- Organizer contact and social icons
The registration action leads because the post already demonstrates the activity. Practical studio details remain close, while future workshops do not compete with the date being promoted.
Multi-day conference
Primary job: help a visitor choose attendance, understand the program, and reach authoritative travel information.
- Register for the conference
- Compare in-person and virtual passes
- Browse the current agenda
- Venue, travel, and accessibility
- Speakers and session details
- Registered-attendee help
- Sponsor and media enquiries
The conference may require a full website, but the bio page can make the first decision much smaller. Attendee support stays separate from commercial enquiries.
Free community event
Primary job: confirm attendance and remove uncertainty about time, place, and access.
- RSVP for Saturday's neighborhood repair café
- Time, venue, and step-free entrance
- What to bring
- Volunteer information
- Weather or same-day update
- Other community events
- Organizer contact
“Free” does not mean the event can skip capacity, accessibility, or cancellation information. The RSVP destination should explain what the registration does and whether places are limited.
Recurring music or arts promoter
Primary job: feature the next confirmed date without losing the organizer's wider calendar.
- Get tickets — Friday night showcase
- See the lineup and venue details
- Browse all confirmed dates
- Ticket help and entry policy
- Join event announcements
- Artist or vendor enquiries
- Social profiles
This differs from an artist's own page. The organizer leads with the event and its attendee path; individual performers can remain on the lineup or event page.
Measure registration, not just outbound clicks
A bio-page click is a handoff, not a ticket sale, RSVP, check-in, or attended session. Keep the stages separate:
- social post view or engagement;
- profile visit;
- bio-page visit;
- outbound click to the ticket, schedule, or details destination;
- registration or ticket order recorded by the provider;
- refund, cancellation, or transfer where relevant; and
- attendance or check-in recorded by the event system.
Use consistent campaign labels when your analytics and consent setup support them, but do not add tracking parameters that break a ticket-provider link or expose personal data. Compare like periods and distinguish free registrations from paid orders. A “directions” click on event day is not a new registration, and an outbound “tickets” click does not prove a purchase.
If the ticket button receives few clicks, first check whether the current posts actually promise that event and whether the button is visible, specific, and open. If the ticket page gets visits but few completed orders, inspect the handoff: wrong date, unexpected fees, unclear ticket types, unavailable inventory, account friction, or a mismatch between the social promise and event listing. The bio-page metric identifies where attention went; it does not explain every decision after the visitor leaves.
The paid path for Belink is also a hypothesis unless first-party attribution proves it. An organizer may discover this guide, create a focused page, and choose a paid publishing option only if the public page fits the campaign. Search impressions, article visits, signups, page publication, and genuine paid upgrades are different events and should be measured as such.
A pre-publish and event-day checklist
Test the public page on a phone before a major promotion and again at each event-state change:
- The organizer name and featured event match the ticket listing.
- The date, city, time zone, and attendance mode are unambiguous.
- The first button opens the exact public ticket or registration destination.
- Ticket status and button wording agree.
- The venue, entrance, transport, and accessibility route is current.
- In-person and virtual options cannot be confused.
- Help labels identify the right audience and owner.
- Private stream, meeting, order, and attendee data are not exposed.
- Sold-out, postponed, cancelled, and completed states have a planned replacement.
- Every button remains understandable without the surrounding paragraph.
- The page works at a narrow mobile width with comfortable tap targets.
- Someone other than the editor has opened every destination from a signed-out session.
For a page with many dates or audiences, the link-count decision guide can help you group necessary routes without treating a fixed number as a universal rule.
Frequently asked questions
Should the Instagram bio link go directly to the ticket page?
Use a direct ticket link when one event dominates the campaign and the ticket page gives visitors all essential decision information. Use a bio page when people also need to choose among dates, attendance modes, practical details, attendee help, or other confirmed events. The first bio-page button can still go directly to the featured ticket listing.
What should go first for a sold-out event?
Lead with the honest current state. Use a real waitlist, official resale route, attendee information, or another confirmed event. Do not keep “Buy tickets” active when the destination cannot sell a ticket, and do not imply that more inventory will appear unless the organizer has confirmed it.
Should a hybrid event use one button or two?
Use separate, clearly named choices when the visitor must choose between in-person and virtual registration. If one authoritative event page explains both modes and routes the selection correctly, one button may be enough. Test the choice from a signed-out mobile session and make sure the visitor can recover after selecting the wrong mode.
Where should venue and accessibility information go?
Keep complete information on the authoritative event or venue page, then link to it with a specific label near the ticket action. Include an accommodation contact where appropriate. A map pin alone is not a substitute for entrance, step-free access, seating, sensory, transport, or support details.
How often should an event bio page change?
Review it when registration opens, pricing or inventory changes, the event sells out, practical details are confirmed, the event is postponed or cancelled, event day begins, and the event ends. The public URL can stay stable while its primary action changes with the attendee's next real need.
Give every attendee a current next step
An event link in bio page earns trust by staying current. Lead with the featured event and exact participation action, send transactions to the system responsible for them, keep practical attendance information nearby, and replace expired states promptly. The page does not need to run the event; it needs to make the next step obvious and reliable.
You can create a Belink page , arrange the ticket, details, and support routes, then test the full journey on a phone before the next announcement goes live.